We live in an era where the work of tilers has reached a completely different level than what we were used to just a few years ago. Over the last decade, tile processing technology has advanced, and emphasis on detailed precision in laying, cutting, and gluing has increased. It is becoming standard that finishing trims are used minimally, and an experienced tiler should be able to create recessed flush buttons, electrical outlets, and of course, the so-called mitered corners – jolly edges – directly from the tile.
High-quality tools and equipment are an indispensable part of the process and the path to top-tier results. Gluing and grouting corners has become an automatic part of most projects, whether it’s external tile corners processed so that the material aligns perfectly, or custom-made designer sinks.
What are the options for gluing and grouting mitered corners and jolly edges?
Gluing and grouting are two consecutive processes. If you are gluing a sink from tile components, you should use a truly strong adhesive. For us, the most used is the epoxy adhesive AKEPOX 5010 from the German manufacturer AKEMI. Its bond is exceptionally strong, but the curing process is longer and is measured in hours.
The same material is used to create a jolly edge. By mixing the appropriate ratio of color pigments, you can achieve the same shade as the tiling material. This requires a great deal of experience. A small advantage is the longer working time, but the entire process is time-consuming.
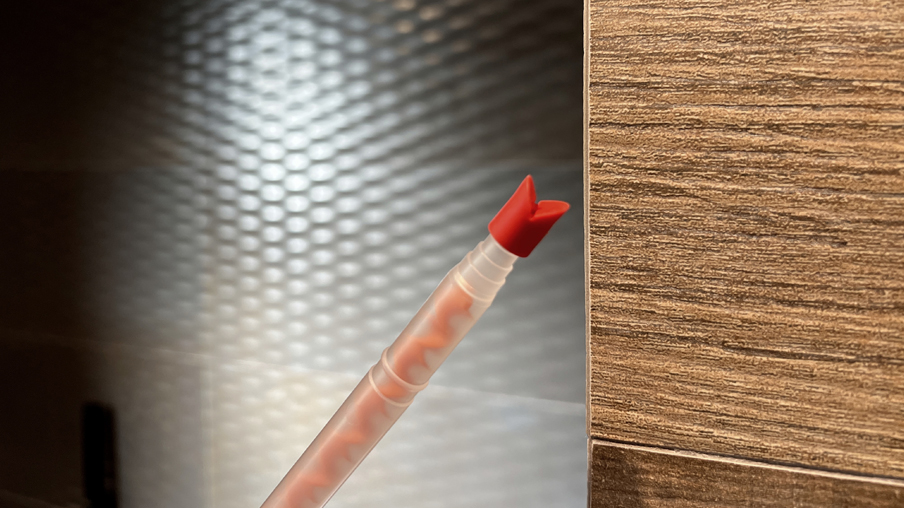
Detailed view of the jolly tip before applying Colour Bond by AKEMI
Is there a way to glue and grout the edge with one material, even in the color of the tile, and quickly?
To be able to write the following lines, I had to wait some time for feedback from our professional tiler clients. It didn't take long for all the points demonstrated to us by the professional chemical supplier AKEMI to be fully confirmed. I repeat this often and will remind you now: feedback from our clients is essential and definitive for us, as we can pass on higher-quality knowledge to other craftsmen based on their experience.
The process of grouting a JOLLY edge is not too difficult and even a less experienced craftsman can handle it. There is no need to worry.
- Before taping, we recommend lightly roughening the prepared corner (degreased and properly cleaned) with, for example, a diamond sponge. We recommend using grit #100 or #200.
- Insert the cartridge with the desired shade into the application gun, attach the mixing nozzle, and then the tip designed specifically for pressing material into the mitered corner - jolly edge.
- Apply Colour Bond directly into the jolly edge.
- To remove excess material, use the jollynator. Use it to pull and smooth the edge.
- Carefully monitor the setting time. The moment the material stops being sticky, excess material can still be trimmed with a blade. Later, it won't be possible.
- Wait 20-30 minutes for full curing and then grind the edge with a fine polishing pads or a diamond sponge.
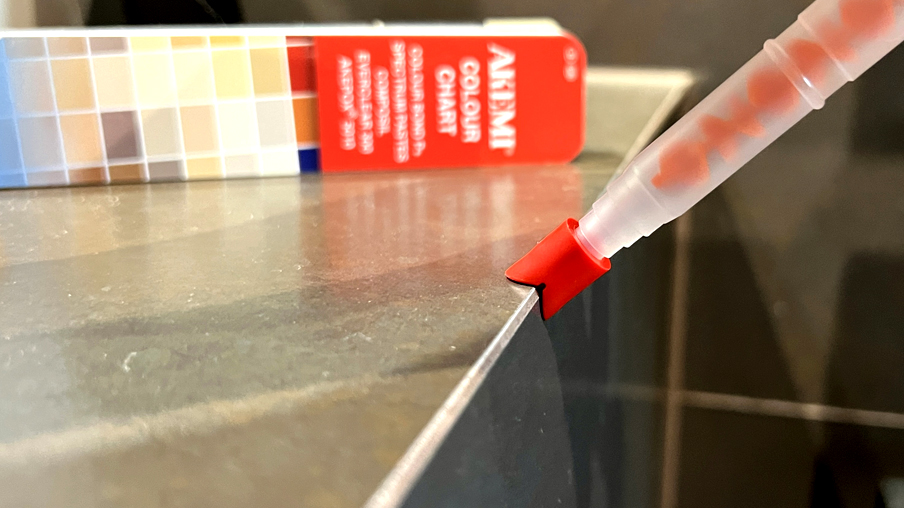
Detailed view of the sophisticated tip geometry in the jolly edge.
The same edge along the entire length? It goes smoothly with the Jollynator
At first glance, it is a simple and small piece of plastic with a significant price tag. Why is it so valuable? It's because it was laboriously designed and patented by one of you – an experienced tiler who designed all the angles and curves so that the result is perfect with as few passes as possible. Time is a precious commodity, and the jolly needs to be done without unnecessary delays. That is why the entire Colour Bond project is focused on saving time when mixing the perfect shade, processing time, full curing time, and creating the cleanest edge shape possible.
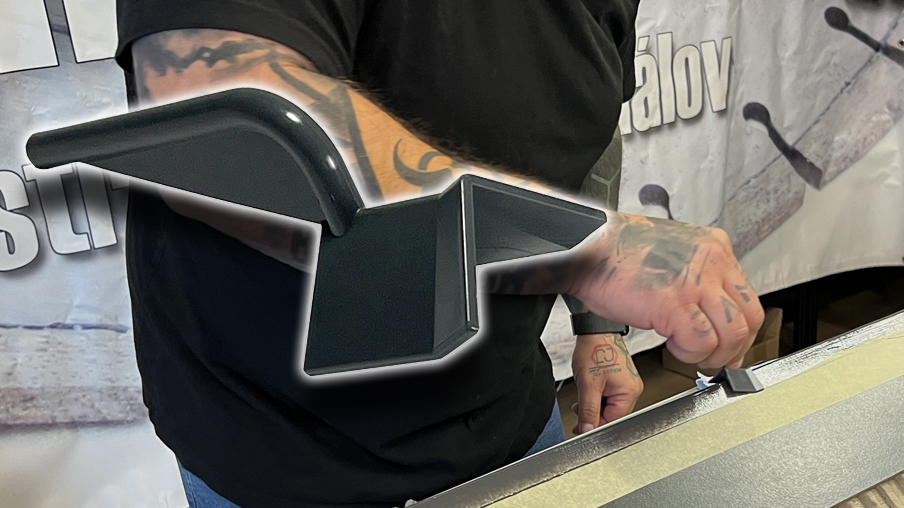
Applying Colour Bond and shaping the edge using the JOLLYNATOR spatula.
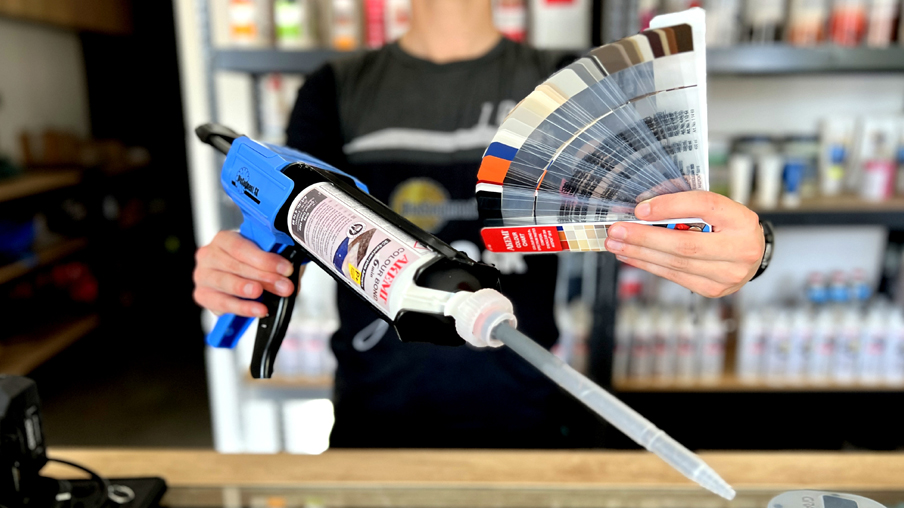
Testing at DiaSegment with Mr. Vavrečka from J&J Tile Design.
Would you like the edge glossy or matte?
An interesting feature of Colour Bond is that it is glossy in the final result. This means that to get a matte finish, you need to grind it with grit 200 or 400. If you need to achieve a high gloss, continue with grits 800, 1500, and if necessary, use grit 3000.
To process such an edge, it is suitable to use sanding sponges or sandpaper designed for stone grinding. More experienced masters with a steady hand use polishing pads. To level out unevenness, you can use a tool with grit #100 or #50.
How much can you get out of one tube of Colour Bond?
Since this material is suitable for both gluing and creating the visible edge of the tile, we cannot determine exactly how much material you will consume when gluing and grouting simultaneously.
- It is estimated that from one cartridge you can make approximately 14 meters of Jolly edges.
- For an approximate calculation of material consumption, you can use the calculator on the AKEMI.de website.
Have you chosen the color yet?
Some craftsmen have already encountered it, others haven't and couldn't hide their surprise. The color chart is expertly crafted, but unfortunately, you have to purchase it or borrow it from the DiaSegment store.
Manufacturing the color chart is too expensive to be wasted, which would have to be reflected in the price of Colour Bond. Ultimately, this would also directly impact the final price of your project. The manufacturer guarantees that the shades in the chart are 100% identical to the shades filled in the cartridges.
The Colour Bond color chart offers many basic shades of black, white, gray, cream, and beige, which we try to have in stock in sufficient quantities at our store in Žilina.
Shades that are less frequent can be ordered within a few days. These include shades of red, brown, blue, or khaki.
I would like to draw attention to the shade marked MAGIC, which you can find next to the color name and number. It is included, for example, in the beige color chart. Its composition is partially transparent and therefore suitable for use with granular materials, as it partially adopts the pattern or structure of the surrounding material.
Colour Bond is not just a grout. It is also a strong epoxy-acrylate based adhesive suitable for stone masons.
This means that the bonded joint has strength properties similar to epoxy adhesive but with a fast processing time. The disadvantage of these materials is that they are not resistant to UV radiation and frost; therefore, the manufacturer cannot guarantee stable color consistency or strength in exterior applications.
Due to its fast bonding properties, this product is also favored by stone masons who use Colour Bond to quickly fix stone elements. In combination with a strong epoxy adhesive that has a longer curing time, they achieve a fast and durable bond suitable even in demanding exterior conditions.
Stone masons involved in interior architecture use Colour Bond to glue all visible joints and corners, similar to how tilers do it.
Colour Bond material is highly polishable and is therefore equally suitable for combining with glossy, matte, and granular surfaces.
It would be good for you to know these valuable tips
- At 10 degrees Celsius, the working time is 10-16 minutes; at 20 degrees, it is only about 6 minutes. The higher the temperature, the shorter the processing time.
- By using, for example, a car cooler and thus cooling the Colour Bond, you can regulate the processing time.
- Watch out for heat sources, fans, working near radiators, and the influence of underfloor heating.
- Have you stored the material in a car in the sun? Watch out, it might surprise you!
-
By storing Colour Bond at a temperature of 5-20 degrees Celsius, you maintain a shelf life of at least 12 months.
Do you have material left in the cartridge and don't want it to degrade further?
It certainly doesn't hurt to keep unused material usable for as long as possible. Even if you might not use the specific color shade, you can use its strong bonding properties.
What wasn't mentioned in the article is that Colour Bond is a two-component epoxy-acrylate adhesive that mixes in the mixing nozzle, similar to a chemical anchor. Therefore, if you have unused material left, you can preserve it in two ways.
- Leave the hardened material in the mixing nozzle. This process, once hardened, stops further chemical reactions and prevents air intake.
- By removing the mixing nozzle and reusing the original caps on the Colour Bond tube.
What do I need to start working with Colour Bond by AKEMI?
In addition to a perfectly prepared, cut, ground, degreased, and dust-free surface, you also need the necessary equipment. If you have chosen a shade, you will certainly need a dual-piston application gun. In our offer, you will find the original product from AKEMI or its cheaper alternative.
What you should have in sufficient supply, however, are spare mixing nozzles and potentially jolly tips. These are disposable consumables in which the material hardens shortly after application.
We at DiaSegment are ready for your visit, questions, and insights.
Not sure and would like to try Colour Bond on one project before buying equipment?
We are well aware that professional equipment from AKEMI is not cheap. As it goes, what is high quality is usually not cheap. That's why we have prepared a pro-customer service for you. Under simple conditions, we can lend you an application gun or the Colour Bond color chart.
- We do not charge any fee for borrowing the color chart or application gun.
- The borrowed color chart must not be damaged, stained, or dusty upon return.
- When borrowing, you provide a refundable deposit in the amount of the list price, which will be returned to you immediately upon returning the borrowed item.
- The free loan period lasts up to 14 calendar days.
What do you say to that? Are those fair terms?
Conclusion
In today's article, we introduced you to a product that takes the work of tilers and stone masons to a whole new level. Just prepare the right shade in advance, get an application gun, buy a few cents worth of consumables, and show the investor professional performance and professional results.
We would like to express special thanks to Mr. Igor Balašov, the exclusive importer of AKEMI chemicals and products to Slovakia, for preparing and presenting the Colour Bond products.
For the drive and enthusiasm in testing new products, we express our gratitude to our Czech partner, Mr. Kuba Vavrečka from J&J Tile Design, a specialist in innovative and designer solutions for bathrooms.
"Colour Bond is a product for professionals! Ask yourself if you are a professional!"


Pavol Šáray
CEO & Technical Expert at DiaSegment
I spend most of my time in the field with customers, where we look for the best solutions for their specific tasks directly at construction sites or in stone-cutting workshops. These trips are my greatest inspiration – I process practical insights into professional articles to help you navigate the subject. Since I am often in full work mode, you might not catch me immediately, but I will be happy to devote my full attention to your questions.
✉️ Email: diamantovenastroje.cz@gmail.com
📞 Mobile: +421 903 528 039
Available on working days 8:00 AM – 4:00 PM.
If I don't answer, please send me an SMS or WhatsApp, and I will get back to you.